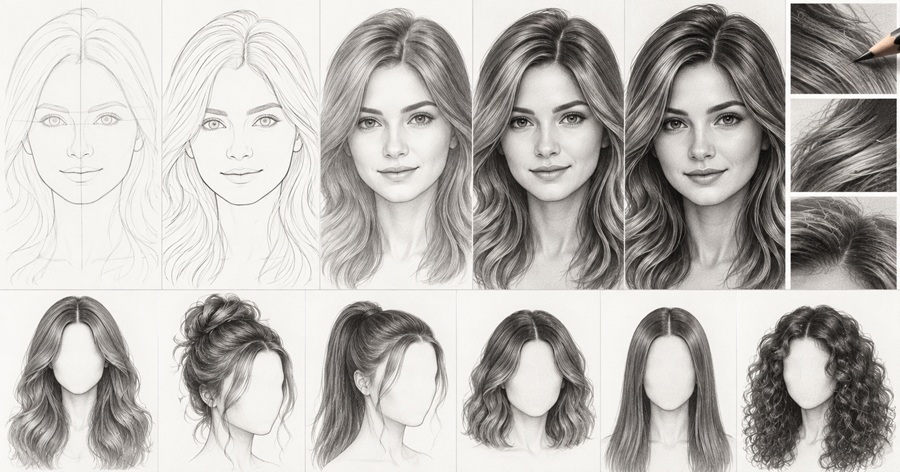
Understanding how to draw hair can be challenging for beginners. However, knowing basic hair drawing techniques can help when drawing realistic portraits, anime, or simple cartoon hairstyles.
Hair has many elements such as volume, direction, highlights and shadows.
The simplest way to draw beautiful hair is to start with basic shapes and understand how hair grows naturally.
Within this guide you will learn how to draw hair step by step. You will also learn useful shading techniques and common mistakes to avoid. This guide includes how to draw straight, curly, wavy, short and anime hairstyles.
How to Draw Hair – Quick Summary
| Details | Information |
|---|---|
| Skill | Hair Drawing |
| Difficulty | Beginner-Intermediate |
| Time | 20-60 Minutes |
| Tools | Pencils, Eraser, Sketchbook |
| Best Pencils | HB, 2B, 4B, 6B |
| Techniques | Sketching, Shading & Blending |
| Hair | Straight, Curly, Wavy & Short |
| Best For | Beginners, Students & Artists |
What you will need
Gather a few basic items to help you learn how to draw hair with a pencil.
You won’t need anything too expensive to create some beautiful hair.
Essential Items
| Item | Description |
|---|---|
| HB Pencil | Basic outlines and light sketches |
| 2B Pencil | Medium shading |
| 4B Pencil | Dark shading |
| 6B Pencil | Deep shading |
| Eraser | Correct any mistakes and create highlights |
| Sketchbook | For practicing your drawing |
| Blending Stump | Blend your pencil shading |
As a beginner, you can start with an HB pencil and normal eraser.
How to Draw Hair Step by Step (Beginners)
Understanding the basic structure of hair will help you when drawing detailed hairstyles.
Follow these easy steps to improve your drawing.
Step 1 – Draw the Head
Start by drawing a basic head shape.
Draw an oval shape for the face and draw some simple guidelines to indicate where the forehead, eyes and hairline will be.
Keep your pencil strokes light as these will be erased later.
This will help you understand where to start drawing the hair.
Step 2 – Draw the Hairline
The hairline indicates where the hair begins to grow from the scalp.
Draw a curved guideline across the forehead.
Everyone will have a different hairline.
Some hairlines will be straight, some rounded and some will be uneven.
Try not to draw the hairline too high or too low unless it is needed for the style.
Step 3 – Basic Hairstyle
Instead of drawing individual hairs, draw the basic shape of the hairstyle.
If drawing long hair, draw flowing sections starting from the top of the head down towards the shoulders.
If the hair is shorter, draw some small shapes around the head.
Leave some space between the skull and the outside edge of the hair to create volume.
This will give a more natural look.
Step 4 – Split into Sections
Split your hairstyle into several large sections.
These are sometimes referred to as ‘locks’ of hair.
Look at the direction of the hair.
For example, you may have hair flowing down from the crown of the head. The side sections of the hair may also be curved.
This will stop the hair looking flat.
Step 5 – Add Individual Hairs
Now you have a basic structure; add some individual hairs.
Draw some curved lines in the direction of the hair sections.
Try not to make all the hairs the same.
Some should be longer, shorter, thicker, or thinner.
When drawing realistic hair, try to keep it natural.
Step 6 – Shade
Shading will add depth to your hair. Start with light pencil strokes and gradually build up pressure to create darker areas.
Focus on adding shadows to the roots of the hair, underneath sections of hair and behind the ears.
Use a 2B or 4B pencil for the darker sections.
Leave some areas lighter to create reflections.
Step 7 – Add Highlights & Final Touches
Adding highlights will make your hair look glossy.
Use an eraser to create some thin, bright areas. Add a few stray hairs around the forehead and outer edges.
Finally erase any extra guidelines and tidy up your hairstyle.
You now have a basic hairstyle.
How to Draw Realistic Hair
To help you understand how to draw realistic hair, observe how the lighting, texture and movement affects the hair.
Most realistic hair will have multiple layers of shading.
Look at your reference image and identify the darkest and lightest areas.
Start by drawing some light lines to create the main sections of hair.
Build up the darker areas by layering your pencil in the direction of the hair.
Try not to draw dark outlines around every individual hair. Instead use a combination of shading and highlights to create the illusion of individual hairs.
Top Tips
- Draw in the direction of the hair.
- Use different pencil grades to create contrast.
- Try to leave some highlights between the dark areas.
- Draw some overlapping sections of hair to create depth.
- Don’t over-blend as this will take away the texture.
Practicing these techniques regularly will help your portraits look more realistic.
How to Draw Straight Hair
Straight hair will usually have flowing sections.
Start by drawing the head and identifying the hairline.
Draw some long, slightly curved lines going downwards.
Try not to make every section perfectly straight as natural hair usually has some movement.
Add some darker shading to the roots and underneath sections of hair. Leave some thin highlights down the length of the hair.
For long straight hairstyles, draw your pencil in one motion to give a smooth effect.
How to Draw Curly Hair
To learn how to draw curly hair, understand how to create volume and overlapping sections.
Curly hairstyles will usually look fuller.
Start by drawing the outside shape of the hair using rounded shapes.
Split your hair into large sections of curls.
Draw some curved or spirally lines to create individual curls. Some of the curls should overlap to create depth.
Top Tips for Easy Curly Hair
- Don’t draw perfect circles.
- Make some of the curls bigger or smaller depending on the style.
- Add some shading between the overlapping curls.
- Leave some areas lighter to create highlights.
If the hair is very curly, focus on the texture of the hair rather than individual curls.
How to Draw Wavy Hair
Wavy hair will have elements of both straight and curly hair.
Start by drawing some flowing sections. Draw some gentle S shaped curves.
Try to keep the waves uneven to create a natural look.
Add some shading inside the curves and some highlights on the outside. Don’t make every wave the same size.
This technique works well for medium and long hairstyles.
How to Draw Anime Hair
Anime hair is quite different to realistic hair. Focus on simple shapes and exaggerated volume.
Anime hairstyles often have sharp sections, big bangs and dramatic movement.
Step 1 – Draw Anime Head
Draw a simple anime face and identify the hairline.
Step 2 – Large Sections
Draw some large, sharp or curved sections around the head.
Step 3 – Bangs
Draw a few overlapping sections across the forehead.
Step 4 – Outside Shape
Add some volume around the sides and top of the head.
Step 5 – Simple Shading
Add some darker areas underneath the overlapping sections and lighter areas on top.
Anime hair doesn’t need to show every individual hair.
Often the overall shape is more important.
How to Draw Short Hair
Short hairstyles need to be drawn with care.
Start by identifying the hairline and drawing the hairstyle close to the scalp.
Use short pencil strokes to indicate the direction of the hair.
If the hair has texture, add some small overlapping sections. Add some darker shading around the roots and sides of the head.
If the hair is very short, don’t add too much volume.
The final result should look like the natural shape of the haircut.
Common Mistakes
Beginners often make the following mistakes.
1. Individual Hairs
Adding individual hairs too soon can make the hairstyle look messy.
Start with larger sections.
2. Flat Hair
Make sure there is some volume to the hair. Leave enough space between the head and outside shape.
3. All Dark Lines
There are many tones in hair. Use light, medium and dark shading.
4. Not in the Right Direction
The hairs should flow in the direction of the hairstyle. Random lines can make it look unrealistic.
5. Too Much Detail
Too much detail can make the hair look stiff. Focus on the overall shape.
Top Tips to Improve
Take your time and practice regularly. Use reference photos to observe different hairstyles.
Practice drawing individual sections before attempting to draw whole portraits. Experiment with how much pressure you use with the pencil.
Observe how the light creates highlights on straight, curly and wavy hair.
Try practicing the same hairstyle from different angles.
Even practicing for 15-20 minutes regularly can help improve your control and observation.
FAQs
1. How do you draw hair easily as a beginner?
Start by drawing the head and hairline. Then draw the overall hairstyle. Split into sections. Add individual hairs and finally shade and add highlights.
2. How do you draw realistic hair with a pencil?
Use light pencil strokes. Draw in the direction of the hair. Build up the shading. Keep the highlights.
3. What pencil is best for drawing hair?
It’s best to use HB, 2B, 4B and 6B pencils. HB pencils are great for outlines. Softer pencils will create darker shading.
4. How do you draw curly hair step by step?
Start by drawing the outside shape. Split into sections of curls. Draw some overlapping curved sections. Add shading between the curls.
5. How can I improve my hair drawing?
Practice regularly using reference images. Focus on volume, direction, shading, texture and highlights.
Conclusion
Understanding the basic structure of hair, how it naturally flows and shading techniques will make learning how to draw hair easier.
Start with basic shapes, split the hairstyle into sections and gradually add some texture and highlights.
By practicing regularly you will be able to create more natural and attractive hairstyles whether they are straight, curly, wavy, short or anime.